Purpose
To make adjustments to plane settings, including pitch for roof, ceiling, and worklines. Planes are attributes of walls that can be turned on or off. Plane settings can also be assigned to a workline when no actual wall exists.
Prerequisites
A layout
Steps
 Note: Always work in a clockwise manner to define plane boundaries.
- In Layout view, click Settings.

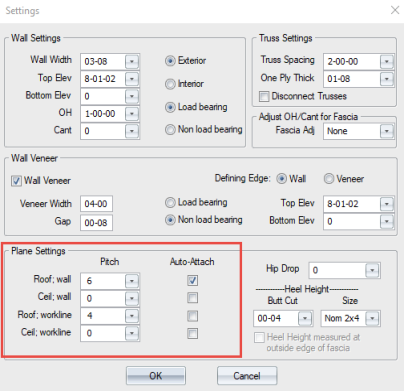
- Edit the Plane Settings.
- Check Auto-Attach to attach roof or ceiling planes during wall or workline input.
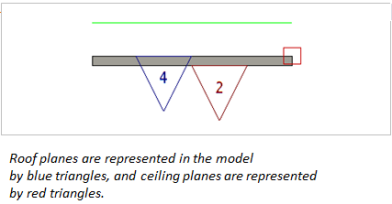
The triangular blue roof and red ceiling plane tags are displayed in the center of the length of the wall. If a roof or ceiling plane is attached to the wall, that plane is centered on the wall. If both a roof and ceiling plane are attached to the wall, the planes are displayed side-by-side.
- Select the Butt Cut from the drop down list. Butt Cut is ignored when the Heel Height measure at outside edge of fascia check box is selected.
- Select the Size from the drop down list
- Note that the Heel Height measured at outside edge of fascia check box is enabled only if the fascia adjustment is set to a value other than None and the overhang is less than or equal to the fascia thickness in the Fascia Adj drop down list.
5. Click OK to save changes.
Cutting Roof Planes
1. Click Cut Roof Planes  or click Alt-R.
2. Select the first plane to cut.
The prompt displays: 
3. Click the plane to cut (define plane boundary).
The prompt displays: 
4. Right-click to finish.